Important Notice:
WordPress 5.0.x UPDATE (learn more)
Art. WordPress Theme Documentation
- Created: 8/11/2017
- Latest Update: 6/2/2018
- By: SeaTheme
Thank you for purchasing our theme. If you have any questions that are beyond the scope of this help file, please feel free to publish your question here.
Thanks so much!
To help us with theme FREE updates with new features please take 1 min to leave stars rating for this theme on ThemeForest if you like it, we'll appreciate it:
- Please go to Themeforest login and navigate to your account.
- Click Downloads link and you will see your purchases list:

- Click stars around our theme to leave stars rating:

- Thanks! This little thing will help us to release new theme updates!
- If you don't like something in our theme or have some problems, please contact us and we will fix your issue and will help you! We are always welcome for your advices how to improve our theme.
Quick Link:
Because the BM Content Buidler plugin and page/post option will not work with block editor for now. We disable the block editor of WordPress 5.0.x by default. If you want use the block editor, please install/activate the Classic Editor plugin(Appearance > Install Plugins).
Installation
To use a WordPress theme you must have a working version of WordPress already installed. For information in regard to installing the WordPress platform, please refer to the WordPress Codex here
Video Guide:
- Extract the package file
- art-theme.zip - Art theme installable file
- documentation folder - help file
- art-child.zip - Child theme installable file
- plugins folder - The plugins install file
- log folder
- Install theme file
- Using WordPress Theme Upload:
Be sure to extract the file "art-theme.zip" from the ThemeForest download before uploading. Using the ThemeForest ZIP file directly will result in a "Missing Style Sheet" error.- Login to your WordPress admin.
- In the "Appearance > Themes" menu click tab "Install Themes".
- At the top of the page click "Upload", then click "Choose File".
- Select the zipped theme file, "art-theme.zip", and click "Install Now".
- After installation you will receive a success message confirming your new install.
- Click "Activate".
- Using FTP:
- Login to your FTP server and navigate to your WordPress themes directory.
- Normally this would be "wp-content/themes".
- Extract folder "art-theme" from the zipped theme.
- Copy the folder "art-theme" to your themes directory.
- After the files finish uploading, login to your WordPress admin.
- In the "Appearance" menu click "Themes".
- Click "Activate" for the theme "Art Lightweight Portfolio WordPress Theme".
- Plugins Installation
After activating the theme, you would notice the message box on the top of admin pages to ask you install/activate some plugins, you could use them for free or cancel the messages. Include: BM Content Builder(must install), BM Slider, BM Tools, WooCommerce, WP Google Maps, Loco Translate, SVG Support ...

- Click Begin installing plugins in this message.
- You could check all required plugins, they are optional. You could install/activate what you need:

Not all plugins are necessary. If you don't need maps, you will not insltall Google Maps. - Import Demo Data
- Install/activate the BM Builder, BM Slider and BM Tools plugin.
- Go to BM Tools > Import, select "Art Theme Demo".

- The "Import Origin Images" is optional, it will download all images from demo website if it is activated.
- Click "Import Data"
- How to update the theme? (click)
After extract the main zip file, you'll see these folders and files:
This template works well for WordPress 4.9.x, update yours if needed.
Installing the theme can be done in 3 ways. You can upload the theme ZIP file using the built in WordPress theme upload, or copy the files through an FTP client.
Setting Up
1. How this theme work? (Brief)
-
Globle settings: in Appearance > Theme Option panel, you could set the whole website general settings, such as logo, header style, main container , font and colour, e.g.
- To set colours, please go to Appearance > Theme Option > Colors (or Appearance > Customize > Colors). You could also set font and colour for individual module built by BM Content Builder
-
Define the fonts. Click here.
-
To create the main content:
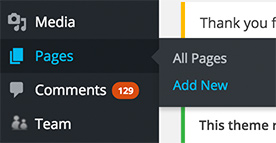
- To create a single project, please go to Portfolio > Add New. Please make sure that the BM Content Builder plugin is actived.
- To create a page(like portfolio list, blog list, about...), please go to Page > Add New, we strongly suggest you create the content by BM Content Builder.
- To create a blog post, please go to Posts > Add New
2. Logo
To set up logo for your website, you need to:
- Go to the WordPress Admin Dashboard.
- Go to "Appearance > Theme Options" (on left sidebar).
- Go to Theme Options > General Settings > Logo section, here you could upload a logo image or input logo text.
The default container for custom logo is 240px(width) * 120px(height), it is the container size. If you want the logo be displayed clearly on retina screens, you need to upload a double size image logo(e.g. 480px x 320px).
Use "Custom Logo Height" to forse the logo size.
3. Frontpage
To set up the homepage, you need to create a page which you want to use it as homepage, after that, go to Settings > Reading , activate A static page (select below) , select the page from Front page: drop-down menu.

4. Menu
Before building your custom menu, you need to create your pages first, then navigate to Appearance > Menus, it is recommended to create you menu from Pages or Links.
5. Theme Custom
- If you only change some style of theme, please go to Appearance > Customize, put your css code to "Additional CSS" box.
- If you want to change more codes. We strongly suggest you use the Child theme, put your own css/js/php file into child theme folder. Refer more about child theme
Theme Options
On admin panel the left hand, click "Appearance > Theme Options" to enter Theme Options

From Theme Options, you could:
- Setup Website Logo - Theme Options > General Settings > Logo
- Set Placehold Text - Theme Options > General Settings > Descriptions
- Set Copyright - Theme Options > General Settings > Copyright
- Set Favicon on browser tab and mobile shortcuts - Theme Options > General Settings > Icon
- Setup Social Media - Theme Options > Social Networks, set social medial icons on header and share button.
FAQ: What's different with Social media link and Social share button - Setup the Colour and background for Website - Theme Options > Colors
- Upload the custom icons - Theme Options > Icons, you could paste the SVG code for "Menu Icon" and "Back Top Icon".
- Main Container Type - Theme Options > Layout > General > Main Container Type, set main container width "boxed" or "fluid"
- Main Container Width - Theme Options > Layout > General > Main Container Width, set main container width
- Main Container Fluid Padding - Theme Options > Layout > General > Main Container Fluid Padding, please enter a number
- Page Loader - Theme Options > Layout > General > Page Loader, Enable Page loading
- Image Lazyload - Theme Options > Layout > General > Enable Lazyload
- Menu Style - Theme Options > Layout > Header > Menu Style, set header layout
- Header & Footer Width - Theme Options > Layout > General > Header & Footer Width, set Header & Footer container width "boxed" or "fluid"
- Header & Footer Fluid Padding - Theme Options > Layout > General > Header & Footer Fluid Padding, please enter a number
- Header Height - Theme Options > Layout > General > Header Height, please enter a number
- Header Bar Sticky Top - Theme Options > Layout > General > Header Bar Sticky Top
- Show Social Links - Theme Options > Layout > Header > Show Social Links
- Show Search Button On Menu - Theme Options > Layout > Header > Show Search Button On Menu
- Enable WPML & Show Multi Language Links On Menu - Theme Options > Layout > Header > Enable WPML & Show Multi Language Links On Menu
- Menu Item Mouseover Effect - Theme Options > Layout > Header > Menu Item Mouseover Effect
- Enable Footer Section for Projects - Theme Options > Layout > Footer > Enable Footer Section for Projects
- Setup Footer Info. - Theme Options > Layout > Footer > Footer Elements
- Footer Elements Align - Theme Options > Layout > Footer > Footer Elements Align
- Setup the meta infomation - Theme Options > Layout > Page/Post > Show Meta On Post Content Page
- Hide Category infomation - Theme Options > Layout > Page/Post > Category to Hide on Page/Post, you could hide some category on posts/pages:

- Enable Post Navigation on content page - Theme Options > Layout > Page/Post > Show Post (Previous/Next) Navigation On Project Item Page(Gallery Post)
- Enable Share Buttons - Theme Options > Layout > Enable Share Buttons for Project(Gallery Post)
- Category for Portfolio Icon on Header - Theme Options > Layout > Page/Post > Category for Portfolio Icon on Header, you could set the item number and columns also
- Activate Mobile layout in mobile device - Theme Options > Mobile > Enable Mobile Layout
- Header Height on Mobile - Theme Options > Mobile > Header Height on Mobile


Fonts Management
To setup the fonts for your website, please go to Fonts Management > Fonts Definition from the admin panel. (If there is not the "Fonts Management" item, please check if the "BM Content Builder" plugin has been installed and activated).

You should define the fonts firstly, there are 4 kinds of source: Google Fonts, Adobe Typekit, Uploaded Fonts and System Fonts.
- Google Fonts: There are 877 free font families.
- Adobe Typekit: It supports 1289 premium font families. But it is limited for free plan.
- Upload fonts: You can upload your own woff/woff2/ttf/eot/ format web font files.
Tips: If it tips "Sorry, this file type is not permitted for security reasons." please add the codes into wp-config.phpdefine('ALLOW_UNFILTERED_UPLOADS', true);check more. - System fonts: It supports to be defined system fonts: Arial, Helvetica, Times and Times New Roman.

Go to Fonts Management > Fonts Assignment to assign the font to webpage elements.

Check the video guide:
Portfolio
To create a new single portfolio(project), go to Portfolio > Add New from the admin panel. (If there is not the "Portfolio" item, please check if the "BM Content Builder" plugin has been installed and activated)

Each portfolio should be assigned one category at least. You could set category to organize the portfolios. For the "Portfolio Grid" or "Portfolio Masonry Grid" module in BM Builder, it would list the portfolio come from the category you have choosed.

You could set "Featrued Image" for posts, the featured image could be shown in portfolio list("Portfolio Grid" or "Portfolio Masonry Grid" module):

You could set "Cover Image" for single portfolio hero image.

- Upload the image or pick up the existed image in media library:

- Set template:

- Set List Layout:

Tips: There is not the option on Slider/Fullscreen template
- Show Video:

Turn on "Show Video", you can enter the embed code to show video above/below gallery.
Tips: There is not the option on Slider/Fullscreen template - Turn on "Show Button" to put a button on the single project page:

- Turn on "Show Property", it looks like:

- Turn on "Show Share Buttons on Introduction Section"/"Show Share Buttons on Bottom", it looks like:

- Enable Title Masking option, the title looks like:

Posts
To create a new post, go to Posts > Add New from the admin panel. (refer to this article)

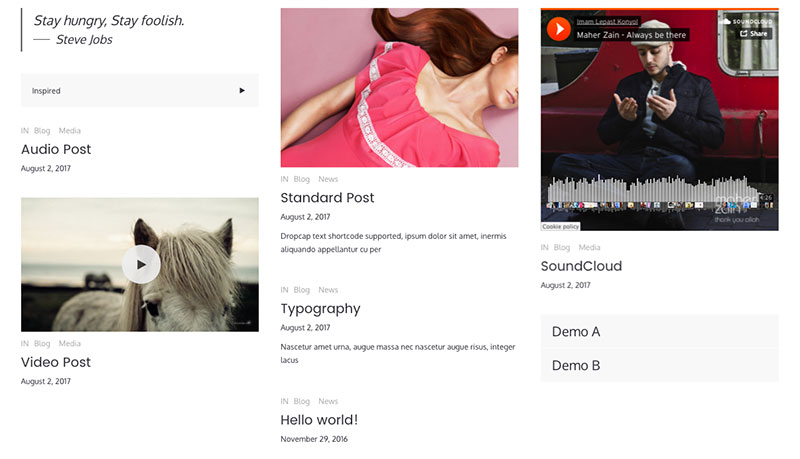
7 Post Formats
The theme provide 7 formats for your post, theses formats would affect the layout of your post in list and content page. You need the to click the radio button to change the format for a post:

- Standard Format Post / Image Format Post / Gallery Format Post: The standard format will show the title, content and featured image. It looks like:

- Audio Format Post: The audio format is supported hosted mp3 files and soundcloud embed code.
The Hosted type looks like:

- Video Format Post: The video format is supported Youtube and Vimeo embed code. You could set ratio for video, it will help to remove the dark padding in single post page as possible.

- Link Format PostYou could set one or more text links within the link format post.
It looks like:
You could redirect the link url by the link format post with BM Slider also.
- Quote Format PostYou could set the quote text within the quote format post.
It looks like:

-
Sidebar Layout, you could set the sidebar layout or fullwidth layout, in sidebar layout, you could choose widget. To set widget, you need go to Wordpess Admin Panle: Appearance > Widgets > Sidebar 1-10 for Post/Page.

-
Excerpt:
Please edit it here:

BM Content Builder
Go to Pages / Add New, you could build all kind of pages.
You'll see the BM Content Builder button:

If the button is not visalbe, please insall and activte the BM Content Builder plugin(refer). Press the button, you'll see the interface of builder. It is inclued 2 parts: settings(left bar) and main content builder(main content).

Settings
Click "Settings", you'll see the page options:

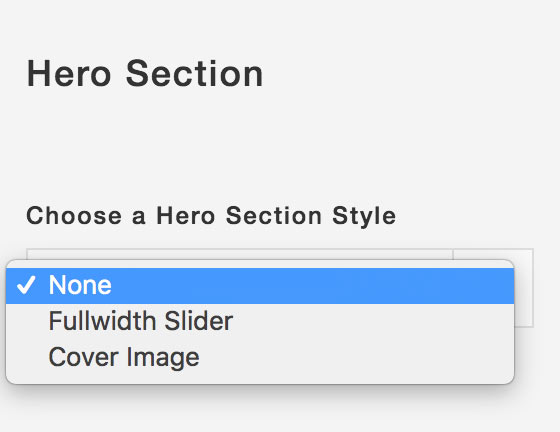
Hero Section
It could be set None, Fullwidth Slider or Cover Image.
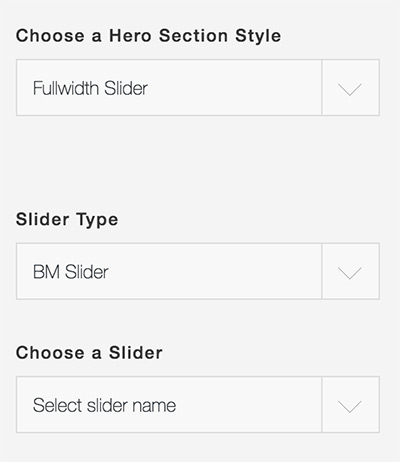
- The BM Slider and Revlution Slider could be set for the Fullwidth Slider:
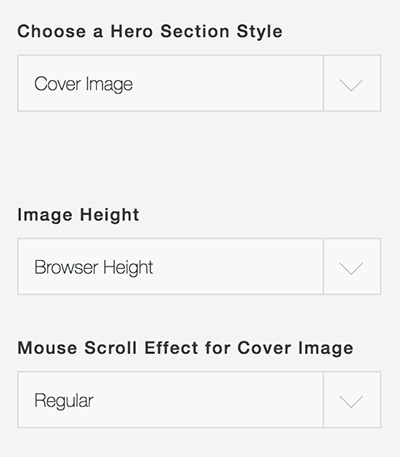
- The Featured Image will be shown for the Cover Image. There is the height and scrolled effect options:
Title
It could be shown/hidden.
Header & Footer
The header and footer could be shown/hidden.
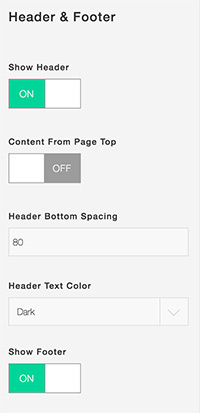
- If "Content From Top" activated, the header will be covered above the content.
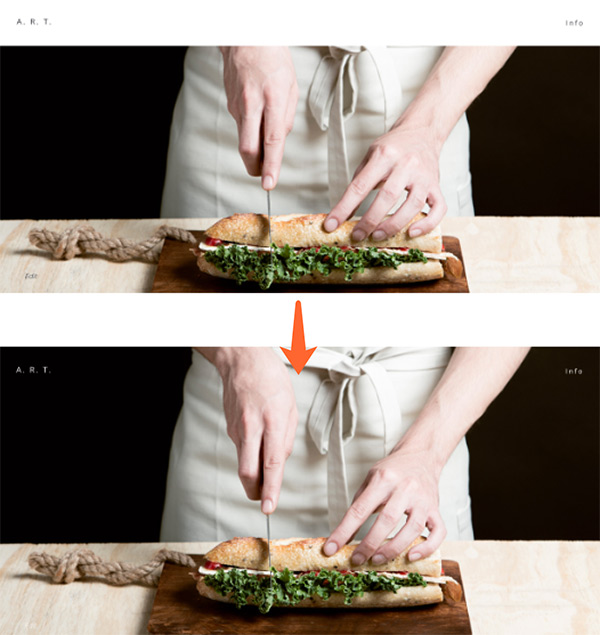
- Enter a vaule(number) into "Header Bottom Spacing", there will be a gap at bottom of header:
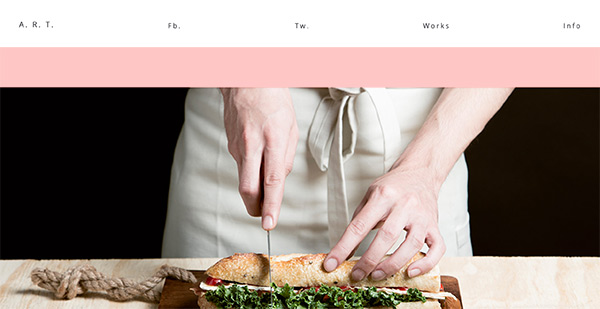
- Set Dark or Light for The "Header Text Color".
Tip:
1) Set the dark and light color value here: Appearance > Theme Options > Color: Plain Text Logo, Menu.
2) If you use image logo, you need upload both dark and light images.
3) Set the default color skin here: Appearance > Theme Options > Color: Others / Logo & Menu Skin on Header.
4) If you both use "BM Slider" and activate "Content From Top", the "header text color" based on image color of each slide item.
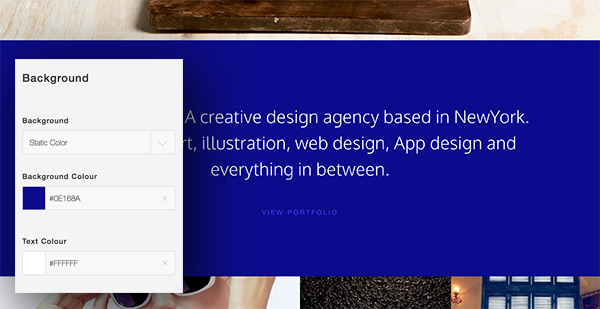
- The page could be set "Background" and "Font" color.
Content Builder
There are 7 modules within the builder: Text, Button, Grid, Custom Grid, Single Image, Button, Content Form and Embed.

Click to add a new module, like Text, the pop-up panle will be shown:

Move the mouse cursor over the "Spacing", you could enter a number for the "Top Spacing(desktop and mobile)" / "Bottom Spacing(desktop and mobile)" of this module.
Enter some text, click "Save", you'll see the real content in the preview area, because the builder is a live editor, you'll see the content what you edit. Move the mouse cursor over the module, there is a tools bar shown.

Click "+" / "-" to increase / reduce the columns. Each module could be set 1-12 cols width. When the module is 12 cols already, click "+", the module will be fullwidth.
Click "Pencil" button to edit a module:

You could set the "Offset" 1-12 cols for each module:

If you move the mouse cursor to the page blank(at the bottom of existed module), the modules bar will be shown:

Check the video guide:
Text
To show the content text or shortcodes, you could use the text module. You could set the "Background color" and "Inner Wrap Width" for the module. Enter the something into the editor.

There is 3rd party wysiwyg editor within the Text module. You could set the "Font color / background color", "Font Size / Line height / letter spacing", "Container Height" and other option with the editor. If you set "Container Height" as "Browser Height", the content in Text module would be vertical centering.
Font color / background color:

Font size:

Click this button if you you want the code mode:

The text editor spport shortcode also, if you want to show a map, please use the WP Google Maps plugin. Add the map by Maps > Maps, Enter the shoertcode likes:

There are Background color, image and video option for Text module.
You could create fullscreen wrap with color, image or video by "Text" module:
- Add a "Text" module, click "Advanced settings", set "Color" "Image" or "Hosted video" for background.

- Click "General settings", set "Container Height" as "Browser Height", click "Save".
- Click "+" to set width as fullwidth.

Single Image
To show the one image, you could use the Single Image module.

There are "Style", "Algin", "Mouse effect" and "Lightbox" options.
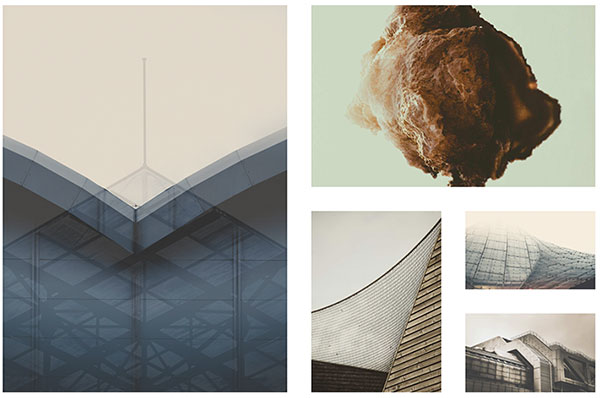
Masonry Grid
- Sourse:
- Media Library: You can choose the images of media library to create portfolio. Please check the video guide:
- Portfolio: to show the single portfolio posts(Portfolio of left admin bar);
- Post: to show the normal posts;
- Woo-commerce Product: to show the product list, it needs to install/activate the Woocommerce plugin;
If you choose scource as Portfolio, Post or Woo-commerce Product, you need Choose a Category. The single portoflio/post/product within this category will be shown. Each post should be set "Featured Image" for thumbnail.

Please check the video guide:
- Media Library: You can choose the images of media library to create portfolio. Please check the video guide:
- Filter:
If you want to show filter for the portfoli list, please enable the "Filter" option. Make sure there are sub-categories in the category of the portfolio list. The category structure looks like:
For "Media library" source, you could set category for each image, but don't set parent category, it will list all categories of level 1 set on images.

You can set category for each image in Media > Library also.

- What Thumbnail Does:
- Open The Portfolio Item: when you click one item, the gallery post page would be linked. If this item is a Link format post, the first url set within link post would be linked.
- Open Lightbox: when you click one item, the full size featured image will be opened in lightbox. If you enter embed video code into "Show Video" of single portfolio or video format post, the video will be shown in lighbox instead of featured image.
- The "Open Custom URL" and "Nothing" are only for from "Media Library".

- Fit Image into Grid: The images are filled into grid by default(the images will be cropped). If it is activated, the images will be fit within the grid, the size of image will be limited in grid.
- Image Lazyload: If it is activated, the images will only be loaded when they are on current screen. The page will be loaded faster.
Grid
It can be set the standard grid like:

It can be set the masonry(waterfall style) list, set "Grid Ratio" as auto, set "Grid List Type" as "Masonry Grid".

It looks like:

Use the Gird module to create a blog page(Resourse: Post, Image Ratio: Auto, Grid List Type: Masonry Grid, Item Style: Image + Text):
Please check the video guide:
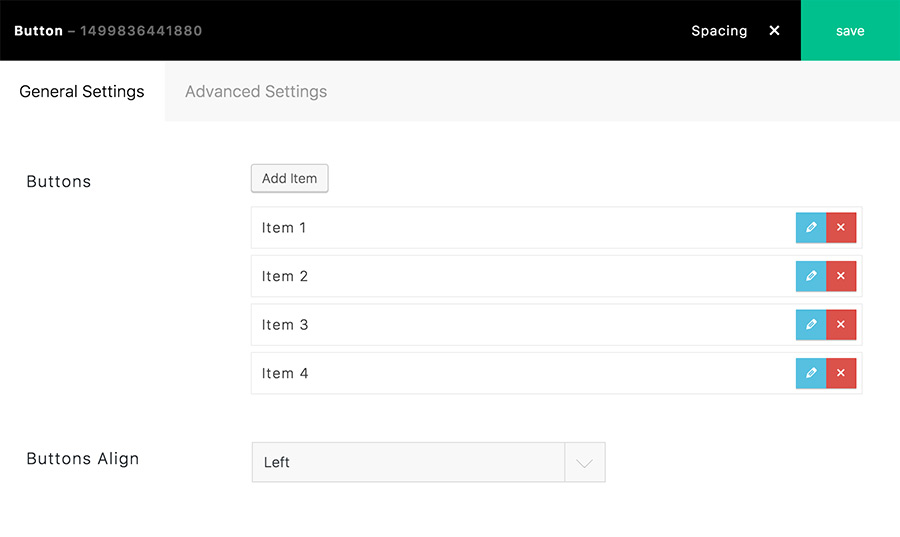
Button
Contact Form

Tips:
1) if you can't receive the mail, please check your mail box, It maybe moved to the spam.
2) Try to use SMTP WP plugin, like http://coffee2code.com/wp-plugins/configure-smtp/
Embed
To enter a video to the page, you need to copy and paste the embeded code of the video, a example with Vimeo video:

Supported video:
- Vimeo
- Youtube
- and other embeded videos from video sites
For Vimeo and Youtube video, you could directly copy/paste the link of the video:

Social Media

Click to share this page by social media, it supports 10 icons
BM Slider
-
Post Slider:
You need to pickup a category(or several categories), all the posts belong to this category would be shown in your slider. Each Post in this category should be set Featured Image. If you click one slide in BM slider, the Post page(shown on this slide) will be linked. If you want to use external link, please use Link Post, input the external URL into the first "Link" box. You could also ask the elements on slider to hide when mouse stop moving.
Translation
1. Tranlate Theme
You can translate the static strings to your language using Loco Translate WordPress plugin(check the DOC) or Poedit. There is the default pot file "art-theme.pot" in /languages/ folder.
2. WPML
It is recommend to use the popular WPML wp plugin if you want to make a multi-languages site:
2.1 Translate the Builder
- Created a new page(make sure under default language), activate builder editor, put in some modules, click publish
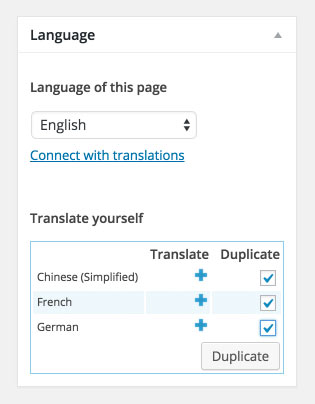
- Check ‘Duplicate’ checkbox and click “Duplicate” (see the screenshot below) at the right sidebar. “Duplicate” button will be displayed after checking of checkbox. Click the pencil icon to translate the page

2.2 To translate the copyright information, Comment title and so on, please:
- Install the plugin WPML String Translation.
- Go to left menu: WPML/String translation
- Find the following string:
- Click “translations” on the right side of every string item, enter the target translated words, check on “Translation is complete" and save it.
    [ux_theme_option]theme_option_descriptions_pagination
    [ux_theme_option]theme_option_descriptions_pagination_loading
    [ux_theme_option]theme_option_descriptions_comment_title
    [ux_theme_option]theme_option_descriptions_your_message
    [ux_theme_option]theme_option_descriptions_comment_submit
    [ux_theme_option]theme_option_descriptions_search
    [ux_theme_option]theme_option_descriptions_blog_more
    [ux_theme_option]theme_option_descriptions_prev
    [ux_theme_option]theme_option_descriptions_next
    [ux_theme_option]theme_option_copyright
2.3 To set the language switcher
- Go to Appearance > Theme Options > Layout : choose the "WPML Switcher" for "Footer Elements", the swithcer will be shown on footer bar:

- Go to WPML > Languages, click "+ Add a new language switcher to a menu", the switcher could be shown in menu.
Included Files
- Javascript files
- Bootstrap v3.3.5 - js/bootstrap.js - Bootstrap framework js
- Modernizr 3.5.0 - js/modernizr-custom.js - Respond user's browser features
- Waypoints v4.0.1 - js/jquery.waypoints.min.js - Trigger something scrolling a anchor
- Isotope v3.0.4 - js/isotope.pkgd.min.js - Masonry layout plugin
- - js/packery-mode.pkgd.min.js - PACKAGED v2.0.0 - For Isotope packery layout
- - js/photoswipe.min.js - PhotoSwipe v4.1.2 - Lightbox plugin
- ImagesLoaded v4.1.2 - js/imagesloaded.pkgd.min.js - Judge images loaded or not
- OwlCarousel v2.2.1 - js/owl.carousel.min.js - Slider plugin
- LazyLoadXT v1.1.0 -/js/jquery.lazyloadxt.min.js - Image lazy load plugin
- VelocityJS v1.5.0 - js/velocity.min.js - Animation effect
- jPlayer v2.9.2 - js/jquery.jplayer.min.js - HTML5 media player plugin
- ie.js - js/ie.js - For IE browser
- custom.theme.js - js/custom.theme.js - Art theme main js
- CSS files
- Bootstrap v3.3.5 - styles/bootstrap.css - Bootstrap framework
- OwlCarousel2 css - styles/owl.carousel.css - Slider plugin css
- photoswipe - styles/photoswipe.css, styles/skin/photoswipe - Lightbox plugin css
- style.css - style.css - theme main css
- style.css - rtl.css - theme RTL css
Once again, thank you for purchasing my theme. If you have any questions that are beyond the scope of this help file, please feel free to publish your question here.
Thanks,
SeaTheme